Brand Identity
Why Brand Identity Matters
Your brand is one of your most valuable business assets. Whether you're a law firm, consulting agency, or enterprise organization, consistent branding across all client-facing documents:
- Builds trust and professionalism - clients immediately recognize your materials
- Saves time and reduces errors - eliminates manual formatting and brand guideline violations
- Ensures compliance - automatically enforces corporate brand standards across all teams
- Increases efficiency - setup once, apply everywhere automatically
TurboDocx's Brand Identity feature allows you to configure organization-wide branding settings that apply consistently across all your document templates. Unlike template-specific font embedding, Brand Identity creates tenant-wide standards for colors, typography, and styling that ensure brand consistency across all generated documents.
Prerequisites Checklist
Before you begin, ensure you have:
- Organization administrator access to your TurboDocx account
- Your organization logo (PNG or JPG format, 200x200px or larger recommended)
- Brand color codes (hex codes if you have them, or we'll extract from your logo)
- A few minutes for initial setup
If you just want to get up and running quickly, jump to the Quick Start section below. You can always come back to customize further.
Quick Start
Goal: Get your brand colors and basic styling applied across all documents quickly.
Step 1: Access Brand Settings
- Go to Organization Settings → Formatting Settings
- You'll see the Brand Identity interface with upload, controls, and preview areas
Step 2: Upload Your Logo
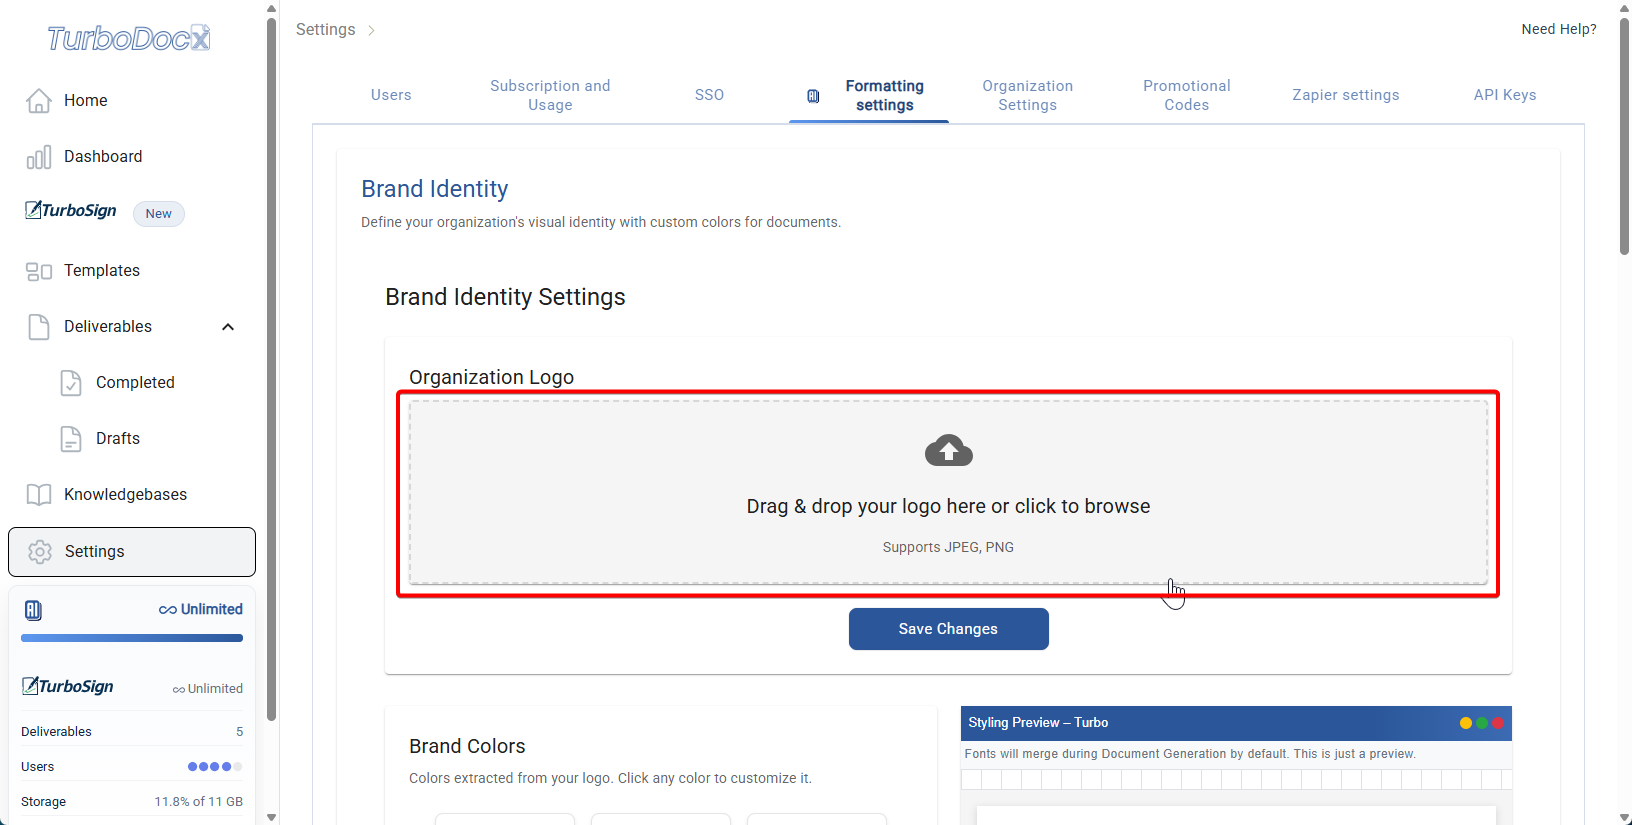
- Click Upload Logo and select your company logo
- Click Save Changes - TurboDocx will automatically extract your brand colors
- You should see extracted colors appear in the Brand Colors section
Step 3: Apply Quick Typography
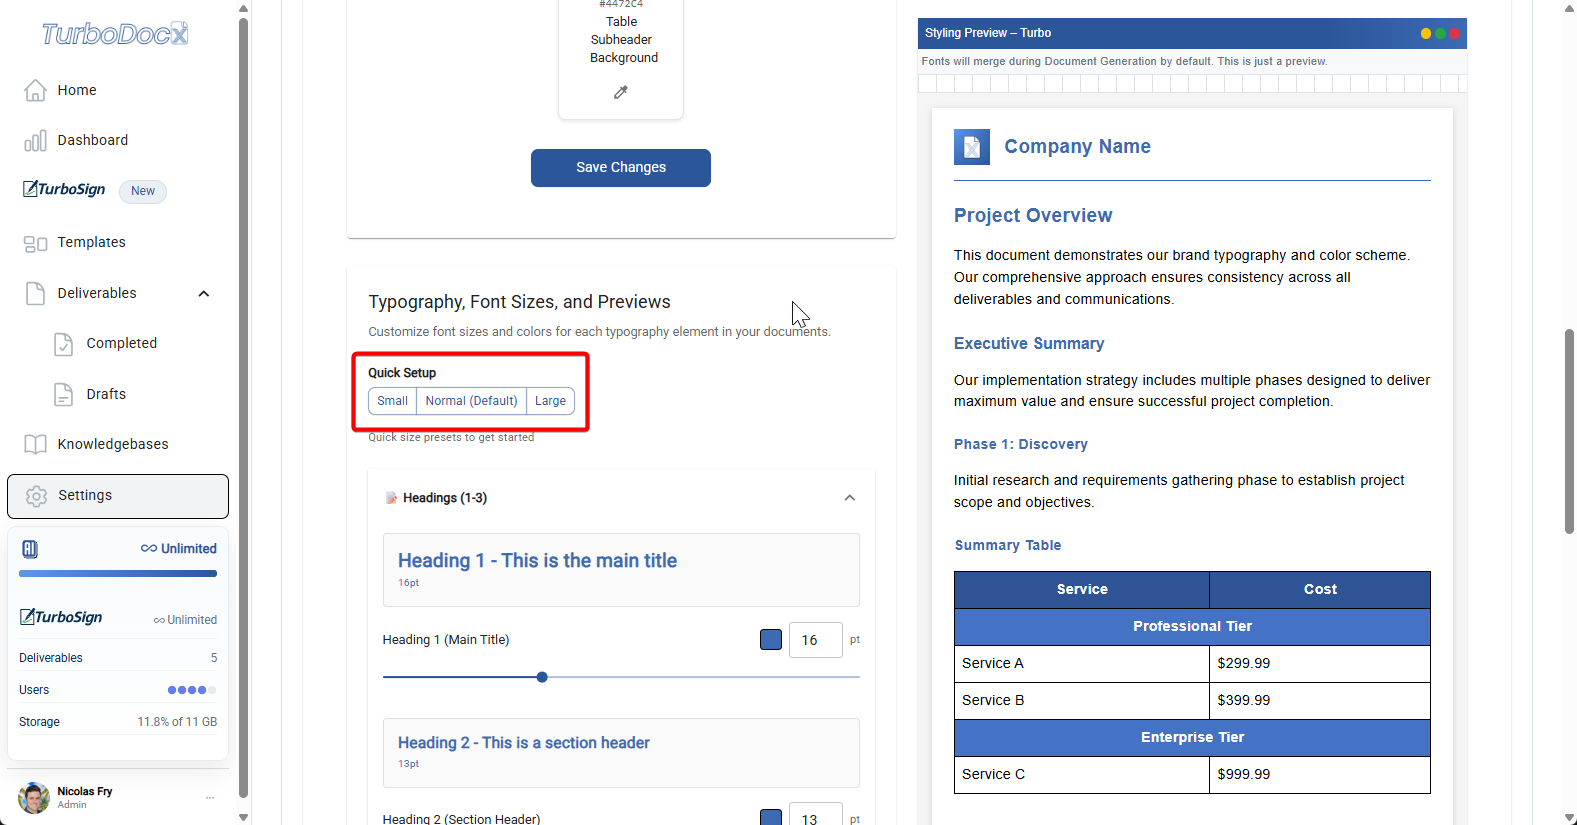
- In the Quick Setup section, choose a preset size:
- Small: Conservative, formal documents
- Normal: Balanced for most business use
- Large: Bold, presentation-style
- Preview panel updates with your new heading sizes
🎉 You're Done!
Your brand identity is now active across all new documents. Existing templates will update to use your brand settings automatically.
Immediate value: All new documents will now use your brand colors and consistent typography without any additional setup.
Overview
Brand Identity configuration includes:
- Logo Upload: Upload your organization's logo for automatic color extraction
- Brand Colors: Use extracted colors or customize manually
- Typography: Configure heading and body text sizes and colors
- Table Styling: Customize table backgrounds, headers, and borders
- Real-time Preview: See changes instantly as you configure
Brand Identity sets organization-wide styling standards, while Working with Fonts covers embedding specific desktop fonts in individual templates.
Detailed Configuration (Optional)
Already completed the Quick Start? Skip to What's Next or continue here for advanced customization.
Choose Your Configuration Approach
Option A: Automatic Setup (Recommended for most users)
- Upload logo → Let TurboDocx extract colors → Use presets
- Best for: Quick deployment, consistent results
Option B: Manual Customization (For brand-specific requirements)
- Custom color selection → Granular typography control → Advanced table styling
- Best for: Strict brand guidelines, unique styling
Accessing Brand Identity Settings
- Navigate to your organization settings
- Select Formatting Settings from the configuration menu
- You'll see the Brand Identity configuration interface with three main areas:
- Logo upload section (top)
- Configuration controls (left side)
- Live preview panel (right side)
You can see the upload area and preview panel side-by-side
Logo Upload & Save
-
Upload Your Logo
- Click the Upload Logo button at the top of the page
- Select your logo file (recommended formats: PNG, JPG)
- Optimal size: 200x200px or larger for best results
- Logo preview appears in upload area
-
Save Changes
- After uploading, click Save Changes to apply the logo
- TurboDocx will automatically analyze your logo to extract brand colors
- The extraction process may take a few moments
- Brand colors appear automatically in the Brand Colors section below
- Use high-resolution logos for better color extraction
- PNG files with transparent backgrounds work best
- Square or horizontal logos typically work better than vertical ones
Brand Colors
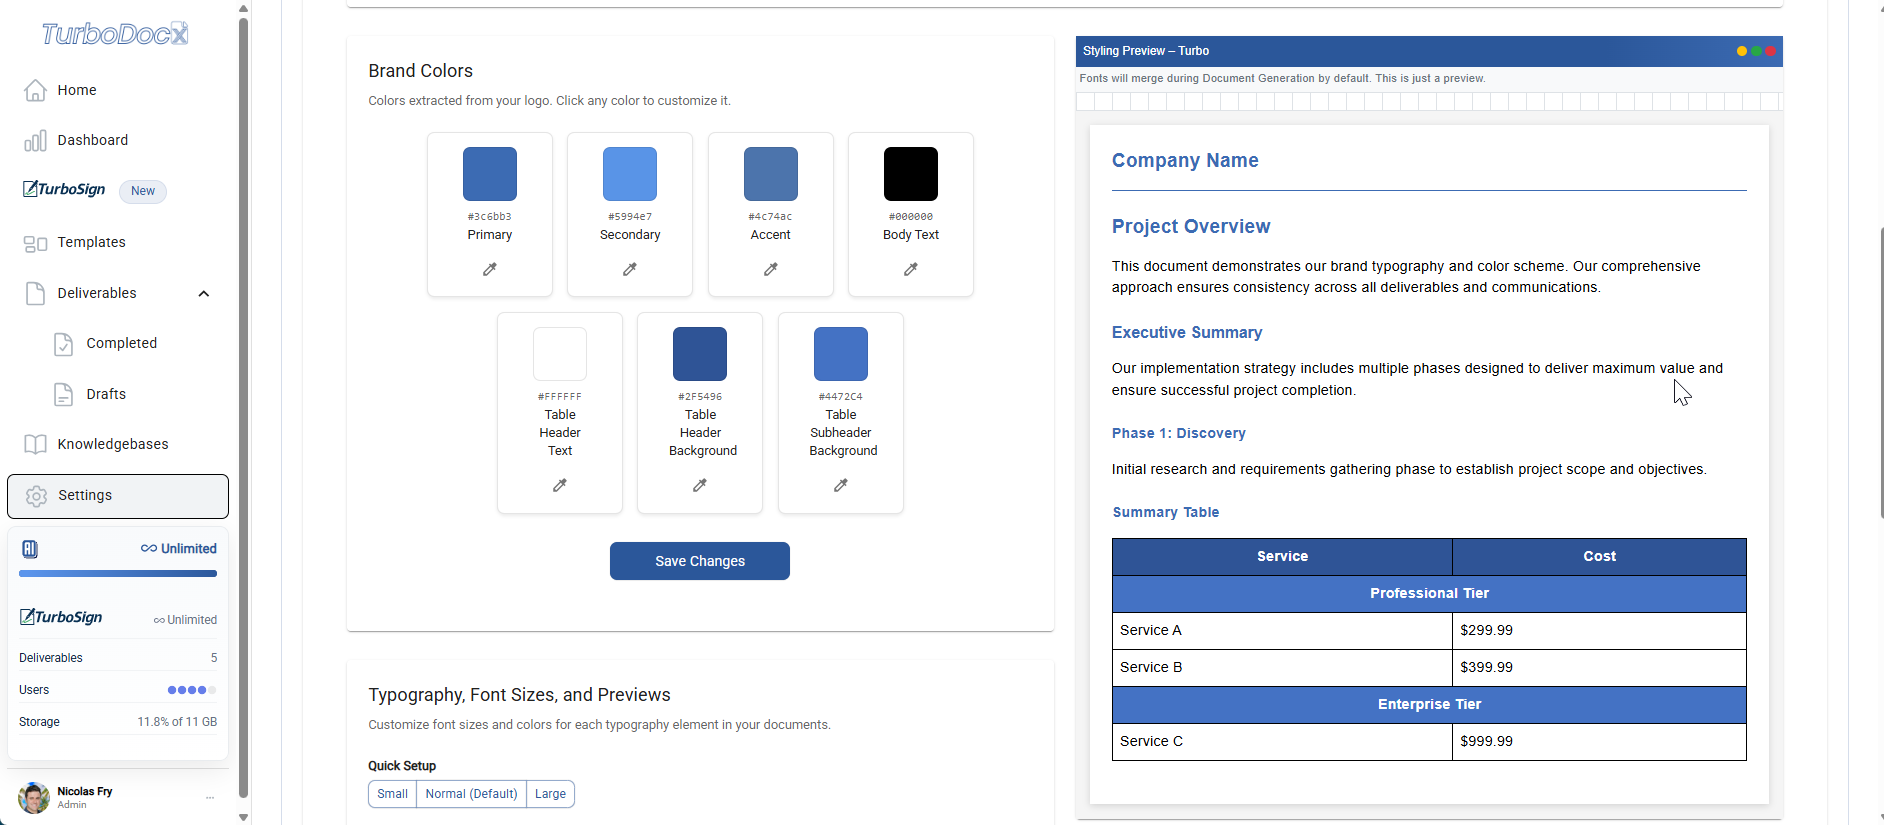
Automatic Color Extraction
Once you upload your logo, TurboDocx automatically extracts your brand's primary colors:
- Primary Color: The dominant color from your logo
- Secondary Color: The most prominent accent color
- Additional Colors: Supporting colors found in your logo
The extracted colors appear in the Brand Colors section on the left-hand side of the interface.
Manual Color Override
When to customize: Your extracted colors don't match your brand guidelines exactly, or you need specific hex codes.
You can customize any extracted color:
-
Override Extracted Colors
- Click on any color swatch in the Brand Colors section
- Use the color picker to select a new color
- Enter specific hex codes for precise color matching
- Colors update in real-time in the preview panel
-
Color Guidelines
- Ensure sufficient contrast between text and background colors
- Test colors across different document types in the preview
- Text remains clearly readable in preview panel
Using the Preview Panel
The Preview Panel on the right-hand side shows:
- Real-time Updates: Changes appear instantly as you modify colors
- Document Samples: See how colors look in actual document layouts
- Different Elements: Preview headings, body text, tables, and other components
Preview panel shows your colors applied to sample document content
Typography & Font Configuration
Quick Setup Options
For rapid configuration, use the Quick Setup presets:
-
Preset Sizes for Headings 1–3:
- Small: Conservative sizing for formal documents (H1: 16pt, H2: 14pt, H3: 12pt)
- Normal: Balanced sizing for most use cases (H1: 18pt, H2: 16pt, H3: 14pt)
- Large: Bold sizing for impactful presentations (H1: 22pt, H2: 18pt, H3: 16pt)
-
Apply Presets:
- Select your preferred preset
- Changes apply immediately to H1, H2, and H3 headings in preview panel
- You can still make granular adjustments afterward
Stop here if: You're satisfied with the preset sizes and want to keep setup simple.
Granular Typography Adjustments
For precise control, expand the typography accordions:
Headings (H1, H2, H3)
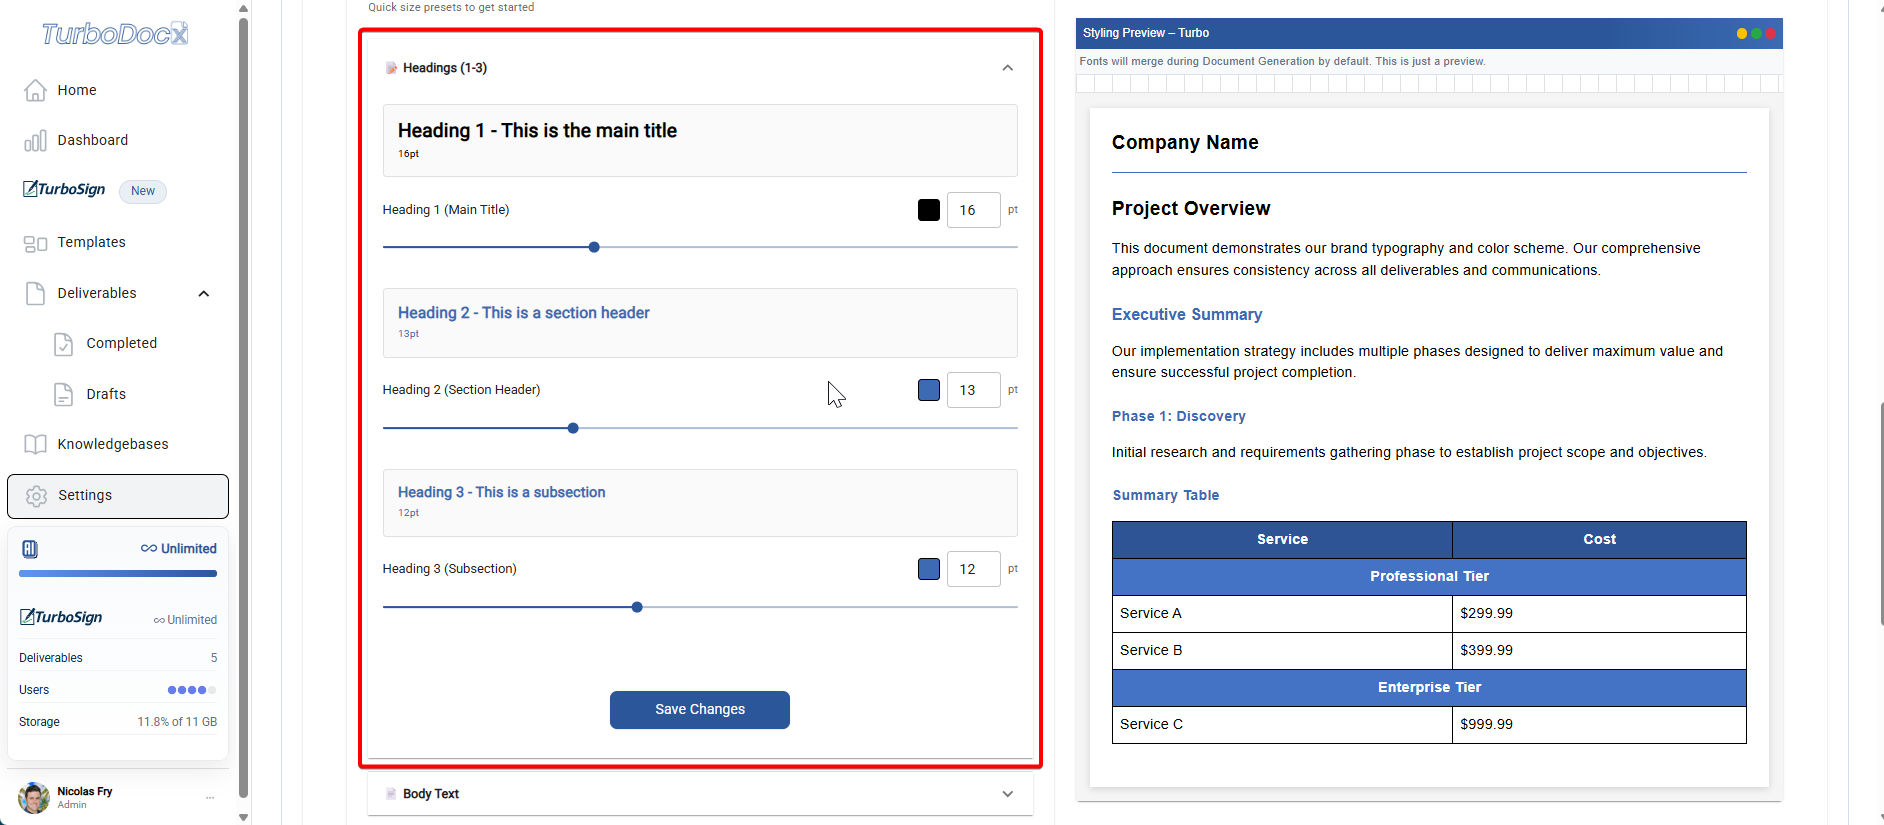
For each heading level, configure:
- Font Size: Adjust size in points or pixels
- Font Color: Choose from brand colors or custom colors
Best Practices:
- Maintain clear hierarchy: H1 > H2 > H3 in size
- Use consistent color schemes across heading levels
- Ensure sufficient contrast for accessibility
Body Text Configuration
Configure body text settings:
- Font Size: Optimal reading size (typically 11-12pt for documents)
- Font Color: Usually darker colors for readability
Table Styling Configuration
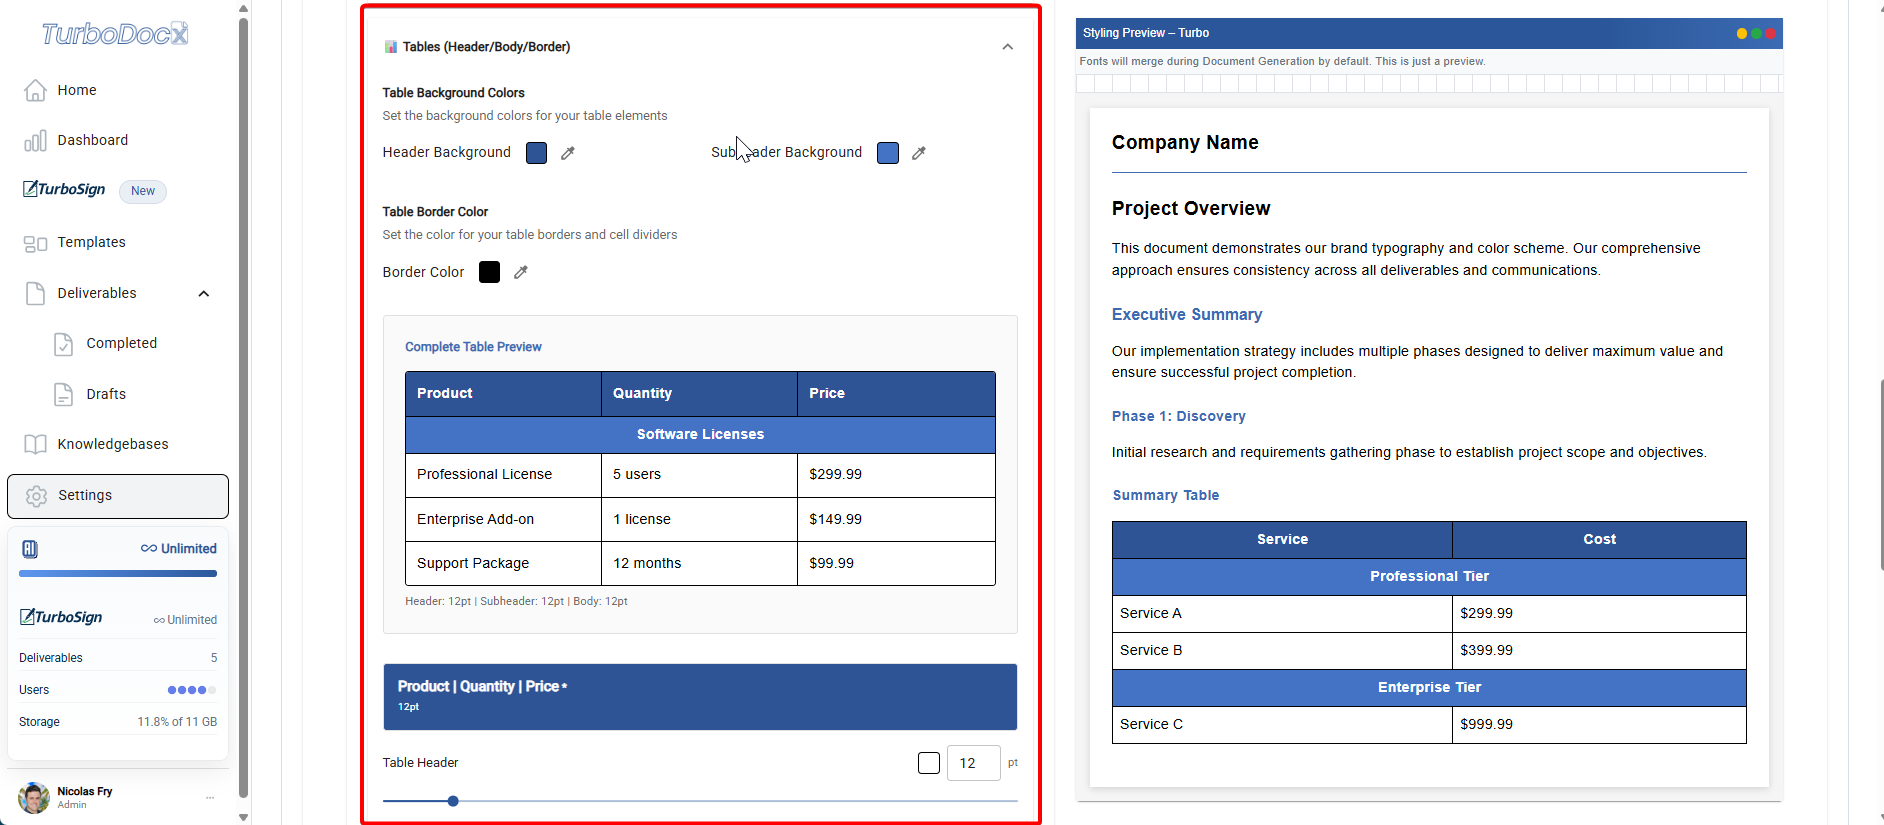
Customize how tables appear in your documents:
Table Background Colors
- Main Table Background: Overall table background color
- Alternating Rows: Optional striped pattern for better readability
- Color Intensity: Adjust opacity for subtle backgrounds
Header & Subheader Styling
Table Headers:
- Header Background Color: Primary header row styling
- Header Text Color: Ensure contrast with background
- Subheader Background Color: Secondary header styling for complex tables
Styling Tips:
- Use brand colors for headers to maintain consistency
- Ensure text remains readable on colored backgrounds
- Consider print-friendly colors for documents that may be printed
Border & Text Styling
Border Configuration:
- Table Border Color: Outline color for the entire table
- Cell Border Color: Internal grid line colors
- Border Width: Thin, medium, or thick border options
Text Colors (Optional):
- Data Text Color: Color for table cell content
- Override Body Text: Use different colors in tables vs. regular text
- Emphasis Colors: Highlight important data points
Table Preview
The preview panel shows your table styling applied to sample data, allowing you to:
- Verify color combinations work well together
- Check readability across different cell types
- Ensure consistent branding appearance
Advanced Configuration Tips
Color Consistency
- Use Brand Color Palette: Stick to extracted or manually set brand colors
- Create Color Hierarchy: Primary colors for headers, secondary for accents
Typography Hierarchy
- Establish Clear Levels: Make H1-H3 distinctly different sizes
- Maintain Proportions: Use mathematical ratios (1.25x, 1.5x, 2x) between levels
- Consider Context: Adjust sizes based on document types (reports vs. presentations)
Template Integration
Your Brand Identity settings automatically apply to:
- New Templates: All newly created templates inherit brand settings
- Existing Templates: Update existing templates to use brand settings
- Generated Documents: All output maintains brand consistency
What's Next?
Now that your Brand Identity is configured, here's how to put it to work:
Immediate Next Steps
- Test with existing templates - Generate a document from an existing template to see your branding applied
- Create your first branded template - Follow our How to Create a Template guide
- Set up team access - Ensure team members have appropriate permissions to use templates
Building Your Document Workflow
- Templates: Your brand settings automatically apply to all new and existing templates
- Deliverables: Every generated document will use your brand identity consistently
- Knowledge Base: Combine with knowledge base entries for fully automated, branded documents
Integration Opportunities
- Salesforce Integration: Branded proposals generated directly from CRM data
- Teams/Zoom Integration: Consistent meeting follow-ups and reports
- Document Library: Build a library of branded templates for different use cases
Start with 2-3 core templates (proposal, report, letter) to see immediate value, then expand your template library as needed.
Troubleshooting
Problem: Logo Won't Upload
Is your file under 5MB?
- ❌ No: Compress your logo file or use a smaller version
- ✅ Yes: Continue to format check
Is your file PNG or JPG format?
- ❌ No: Convert your logo to PNG or JPG format
- ✅ Yes: Check image resolution (should be 200x200px or larger)
Problem: Colors Aren't Extracting Well
Does your logo have multiple distinct colors?
- ❌ No (monochrome/single color): Use manual color override to add your brand colors
- ✅ Yes: Continue to contrast check
Are colors in your logo high contrast?
- ❌ No (subtle/low contrast): Use manual color override for better results
- ✅ Yes: Try a higher resolution logo or manual override specific colors
Problem: Changes Not Appearing
Are changes showing in the preview panel?
- ❌ No: Refresh the page and try again
- ✅ Yes: Changes may take a few minutes to apply to generated documents
Did you click "Save Changes"?
- ❌ No: Click Save Changes to apply your brand settings
- ✅ Yes: Generate a test document to verify settings are applied
Template Application Issues
Brand Settings Not Applying:
- Verify templates are set to use organization brand settings
- Check template-specific overrides that may conflict
- Ensure templates are saved after brand updates
Font Conflicts:
- TurboDocx by default uses the font found in the template
- For custom fonts, use Working with Fonts embedding
Getting Help
If you encounter issues with Brand Identity configuration:
- Check Template Compatibility: Ensure templates support brand identity features
- Verify Permissions: Confirm you have organization admin privileges
- Test with Sample Documents: Generate test documents to verify settings
- Contact Support: Provide specific details about configuration issues and document types
For technical font embedding questions, refer to Working with Fonts.
After configuring your Brand Identity, create new templates or update existing ones to see your branding applied consistently across all generated documents.